Germinating organic seeds provides a simple and economical way to add nutritious foods to our daily diet (trace elements, vitamins, enzymes, phytonutrients, essential amino acids, essential fatty acids...). sprouted seeds are recognized for their high content of vitamins, minerals, enzymes, and antioxidants beneficial to health, making them one of the pillars of living food. One of the essential elements for successful germination is the choice of a good sprouter. With the multitude of options available on the market, it can be difficult to determine the best sprouter for sprouted seeds and green shoots. This article will guide you through the different types of sprouters, their advantages and disadvantages, to help you choose the best sprouter suited to your needs and maximize your seed germination experience.
How does a sprouter work ?
A healthy diet often includes nutrient-rich foods like sprouted seeds, which are an excellent source of essential vitamins and minerals. Therefore, a sprouter is an excellent health investment. You can produce your own super local organic superfoods at home all year round, in any latitude: what could be more local than your own kitchen ?
Here are the steps to successfully germinate seeds and young sprouts easily:
- Type of seeds Sure, please provide the text you would like me to translate. Select organic seeds specifically intended for germination., such as the seeds from our supplier Géo Bavicchi, because they have been specially tested for germination and have a high germination rate. Do not hesitate to ask your supplier for the germination rates. Ours is 95% under optimal conditions. This rate is manually calculated for each batch, and batches below 95% are discarded.
- Pre-soaking the seeds: Put the seeds in a bowl and cover them with water. Let them soak overnight. (The small seeds only require a few hours, but an overnight soak will also work) to break the dormancy of the seeds that will begin their germination process. If you are using an automatic sprouter, this step is optional.
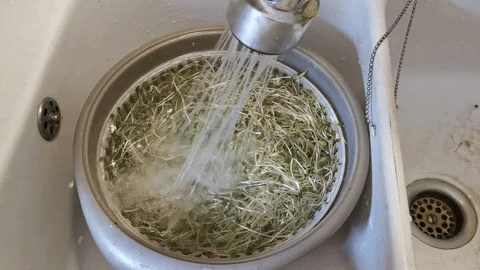
- First rinse of the seedsDrain the seeds and rinse them thoroughly In cold water to remove any residue and to flush out the enzyme inhibitors released by the seeds during soaking.
- Installation in the sprouterPlace the seeds in your sprouter, which can be an EasyGreen automatic sprouter, a glass jar with a perforated lid, a perforated terracotta sprouter (avoid closed terracotta sprouters), a tray sprouter, or a sprouting bag.
- Daily watering and aerationKeep the seeds moist by rinsing and draining them two to three times a day. Also, ensure that the seeds have enough air to prevent mold or rot. Ventilation is very important for small seeds; it is necessary to avoid them forming clumps where air does not circulate and where the heat produced by germination cannot be dissipated.
- GerminationThe seeds will begin to germinate within 2 to 10 days, depending on the type of seeds and the conditions of light, temperature, and the quality of watering and rinsing. From the moment the seeds show a sprout, they are consumable; they can also be grown to a more advanced stage of microgreens.
- Final rinseRinse the sprouted seeds one last time to remove the shells and residues. The ideal is to use a salad spinner with a spray nozzle., The seed coats will float and the ungerminated seeds will sink to the bottom. The latter should be removed. If you don't have a sprayer, stir your seeds in the water.
- Conservation: Biovie advises you to consume your delicious seeds with the following meals or to store them in the refrigerator, making sure to rinse them once a day to prevent them from drying out. Do not let them soak in water.
By following these steps, you will be able to grow your own seeds at home, enjoy nutritious and delicious sprouted seeds, and begin to discover the benefits of a living diet.
What are the different types of sprouters ?
There are several types of sprouters, each with its own advantages and disadvantages.
Glass jar sprouter It seems like your message is incomplete. Could you please provide the text you would like translated from French to English?
This is a glass sprouting jar for seeds, tilted and equipped with a mesh lid, usually made of stainless steel, which allows air and water to circulate. The seeds are placed in the jar, then regularly rinsed and drained. This type of sprouter is simple, inexpensive, and works well for most seeds. Plan to water at least morning and evening.
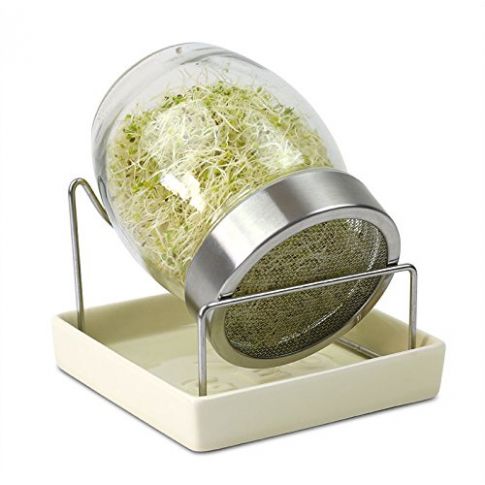
Advantages: Economical, easy to use, ideal for beginners
Disadvantages: The seeds are all over the place with each rinse, which does not allow for nice sprouts if you want to present them gastronomically on a plate. It does not allow for young sprouts, as the small seeds form compact clusters that will be poorly oxygenated. In this case, the risk of mold is significant. Regular maintenance is required, at least twice a day. Not suitable at all for mucilaginous seeds.
Tiered sprouterSure, please provide the text you would like to be translated from French to English.
This plastic sprouter features several stackable trays, each perforated to allow water to flow from one tray to the next. Seeds are placed on the trays and regularly watered from the top. This type of sprouter allows for the cultivation of different varieties of seeds simultaneously and produces a larger quantity of sprouted seeds compared to jars. Plan to water in the morning and evening.
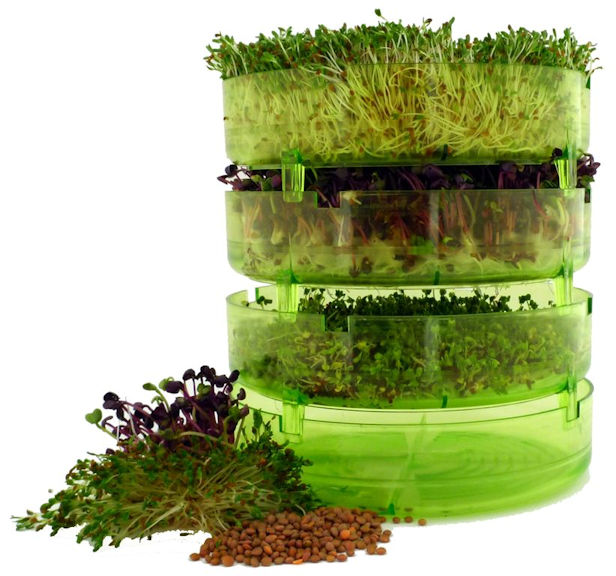
Advantage: You can germinate several types of seeds at the same time or use the same seed at different stages to have a rotation. It is possible to add an additional layer.
Disadvantage: The lower tray is rinsed with water that has already been used on the two upper trays, allowing enzyme inhibitors to circulate from one tray to another. Not suitable for mucilage seeds.
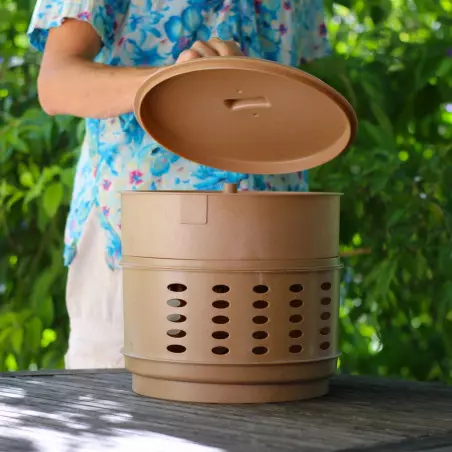
Terracotta sprouter It seems like your message is incomplete. Could you please provide the text you would like translated from French to English?
These sprouters are made of clay and utilize the natural properties of terracotta to regulate humidity and temperature. The seeds are placed in the sprouter, which is then watered regularly. This type of sprouter can be used for seeds that need a consistently moist environment with an absorbent substrate, such as cress, basil, or certain mustards. However, a terracotta sprouter should be perforated to allow the seeds to produce chlorophyll. Plan for a minimum of daily watering.
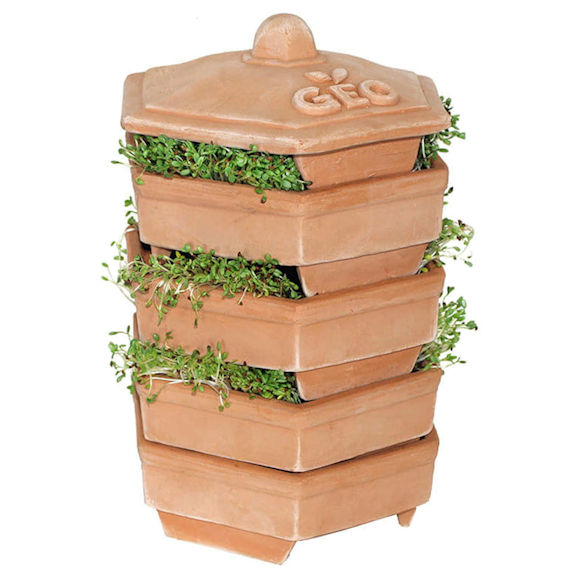
Advantages: Natural material, pleasant to use, clay remains moist and requires less watering than plastic. Multiple types of seeds can be planted in it at the same time. It is suitable for mucilaginous seeds. Keep cool if it gets too hot.smooth interior prevents the seed packets stick to the wall and do not mold during the germination process, and facilitates the growing sprouted seeds
Disadvantage: The pores of the clay can trap mold spores from one harvest to the next, potentially causing a harvest to fail if the sprouter has not been properly cleaned. The terracotta sprouter requires a more rigorous level of hygiene than others; a brush and water at a temperature above 60°C are essential.
Seed sprouter to mucilage:
There are sprouters for certain types of seeds "like the" mucilaginous seeds. Indeed, upon contact with water, they develop a gelatinous substance: mucilage.
For this culture of seeds, only the green shoots are eaten. The germination dish to mucilage is therefore perfect.
The root will develop under the grid of the small bowl "and the thumb of the" seed "germée se formera à la surface" translates to "sprouted will form on the surface."
The mucilaginous seeds are: watercress, basil, flax, mustard yellow, arugula, linen, chia, perilla, purslane, arugula, camelina.
Little tip:
If you mix the mucilaginous seeds "with some" seeds alfalfa, you can use a classic sprouter. You just need to put at least 90% of seeds alfalfa for 10% of mucilaginous seeds.
This allows for a significant amount of time.
Sure, here is the translation:"Advice to avoid the" mold It seems like your message is incomplete. Could you please provide the text you would like translated from French to English?
With these different types of sprouters that we saw, it is possible that some mold appears according to your experience.
This may be due to a excess water, excessive humidity, too much small seeds "in the sprouter that no longer breathes."
Following the type of sprouter, you can already reduce the amount of water per day if the temperature is already humid (temperature between 19° and 22°C).
Avoid exposing your sprouter to direct sunlight; instead, place it in indirect light and also avoid drafts.
Last piece of advice:
Pommes de terre. seeds thinking that they will increase their nutritional potential.
They will just become soft and lose more of their qualityGustatory sensations.
On the other hand, you can absolutely rinse your... seeds "sprouted before consuming them if you are afraid of contamination."
Cloth bag sprouter It seems like your message is incomplete. Could you please provide the text you would like translated from French to English?
This is a bag made of ideally organic permeable fabric that allows air and water to circulate. The seeds are placed in the bag, which is then hung to allow water to drain after each rinse. This type of sprouter is portable, easy to use, and suitable for small quantities of seeds. It is essential to use fabrics with hollow vegetable fibers such as linen or hemp. Cotton is not suitable. Plan for two rinses daily.
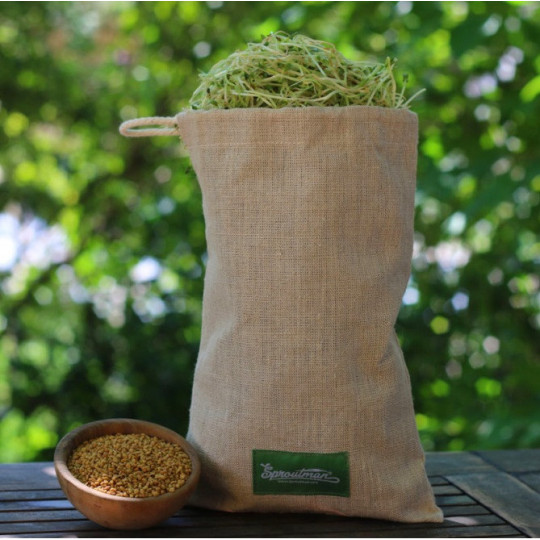
Advantages: This is the ultimate low-cost / low-tech sprouter. Ideal for camping, traveling, picnicking, or on the go. Just soak the bag or run it under water, shake it, and it's ready to go again.
Disadvantages: Cotton is to be avoided. Only a small quantity of seeds can be germinated at a time, and you cannot see the progress of germination at a glance; you have to open the bag. It is not suitable for mucilaginous seeds or green sprouts that cannot turn green. It is a low-production germinator.
To know:
Do not place your bag down in order to allow air circulation. The runoff water should be very clear when you perform the two rinses. Do not hesitate to perform a third rinse depending on the temperature (heat and dry weather).

Easygreen Light automatic sprouter It seems like your message is incomplete. Could you please provide the text you would like translated from French to English?
The Easygreen Light sprouter is both the Rolls-Royce and the 4x4 of automatic sprouters, making it the perfect sprouter for sprouted seed enthusiasts. Sold in 32 countries since 1996, no other sprouter has matched it to date. This sprouter does not use a pump but a rotating hyperbolic funnel that takes advantage of the Venturi effect to energize the water before each watering. It is designed to simplify the germination process by automatically controlling watering, aeration, and temperature solely through a low-tech system of regular misting at set intervals. The Easygreen already stands out for its lightness and ease of maintenance (with a cloth once a week and automatically with white vinegar). You will have the opportunity to obtain a seed germination in just a few days.
How does it work ?
The mechanical timer mists for about twenty minutes, between 5 to 8 cycles. This daily water consumption is between 2 and 3 liters, much lower than what we would consume if we had to wash our seeds daily. It is fully automatic, standing out due to its patented technology and water energizing process. Indeed, this automatic regulation of the interior temperature is ensured by the patented technology, mist, and oxygen. This helps to prevent the development of bacteria and mold. It should be noted that no other sprouter allows theventilation "des" seeds sprouted and the evacuation of heat. The seeds need little water and a lot of oxygen, which traditional sprouters do not provide.
Here, the Easygreen light allows for the application of mist and oxygen. The speed of germination (up to 40% faster compared to traditional methods) is explained by the fine misting of 6-micron droplets.
Furthermore, it is very important to consume quality water since our seeds sprouted ones contain 80%. Non-sprouted seeds, cereals, and oilseeds contain growth inhibitors, phytates, and lectins, which is why it is important to soak them before consuming. Thus, the seeds soaked will release these inhibitors into the water. The rinse water will be drained out of the sprouter, which is a definite advantage. The great benefit of this sprouter is that it is equipped with a 96-position timer to adjust to the temperature and to the varieties of seeds. It comes with 5 trays and has a power of 70 watts.
A notable added bonus, you can add superfoods (algae, liquid kelp) to enhance the nutritional value of your meals. seeds. Note that the trays can also accommodate a substrate of earth to grow wheatgrass ... or other.
Advantages: The germination environment is optimal, with air and water being renewed six times every 24 hours. The germination period is reduced, and the air renewal drastically decreases the risk of losing your crops. This sprouter facilitates the cultivation of seeds, green sprouts, and mucilaginous seeds on a substrate or in a mix, opening up a rainbow of different types of seeds that can be grown.
Disadvantages: An automatic sprouter requires an electrical connection (although it only consumes 18W for 2 hours a day), space, and its purchase cost is higher than that of a manual sprouter.
What do you need to do? Three things to remember:
- Monitor the water level of the reservoir but no worries, theautomatic watering by the misting device will continue to operate without any problem
- Do not forget to harvest the sprouting seeds cultivation obtained and replace them with new ones
- Do not forget to wash your EASYgreen (see the user manual)
Who is this sprouter for:
It is a family sprouter because it has a large germination surface and will be perfect for a large family, but Its revolutionary autonomy will be an ally of the restaurateurs. also.

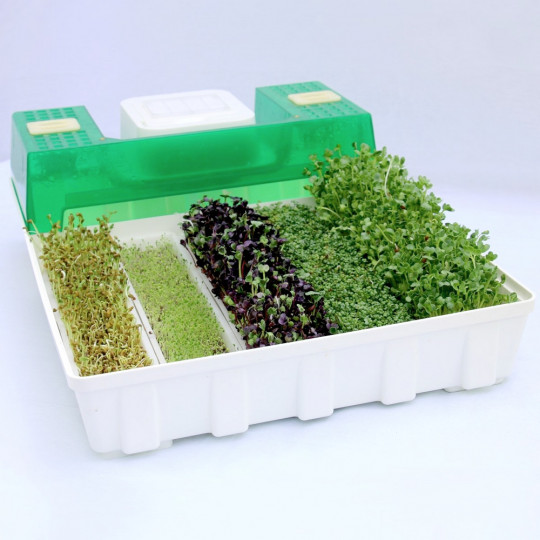
Low-tech gravity automatic sprouter Easygreen Sol It seems like your message is incomplete. Could you please provide the text you would like translated from French to English?
It is a brand-new type of non-electric automatic sprouter made from plastic-free biomaterial by the brand Easygreen. It uses the siphon effect and gravity to water the seeds automatically at regular intervals for 4 to 5 days without any human intervention. He owns a watering In rain, two timers, one normal and one slow. It is portable. Possibilities of 4 varieties of seeds to germinate at the same time. Soaking only the large ones seeds. The floor has a major difference in the material used. A recyclable biomaterial combining mineral and plant elements: plant-based biopolymers (wood) combined with chalk, without any petrochemical materials. This gives it a very pleasant feel. The autonomous sprouter promises to be quiet, lightweight, and perfect for nomads.
How does it work ?
Very clever, the small tank under the 5L tank fills up in a few hours, then allows gravity to drain it in a few seconds into the center of the plateau. The water pours down in a fine rain on the seeds sprouts. Everything is designed for the proper development of the sprouts thanks to the openings that aerate the seeds by letting the light through. A hose is provided with the sprouter to remove the rinse water andwatering.
Advantages: This sprouter combines the benefits of an automatic sprouter with the simplicity of a basic manual device, at a lower price compared to an electric automatic sprouter. Perfect for seed enthusiasts! The height of the germination space greatly promotes the growth of sprouts.
Disadvantage: To access the seeds, you need to move the water tank.
What do you need to do? Four things to remember:
- You drop off your seeds in a thin layer on the plateau germination. You have 4 compartments defined by the strips provided with the germinator. Note that you can fill them on different days to produce seeds "continuously sprouted"
- You fill the tank with filtered water.
- You decide on the timer that will be the key for a automatic watering regular: If you would like a watering normal, a watering slower...
- You close the lid and wait for 3 days for the germination period "and harvest your" seeds
To know:
It is recommended to use coffee filters (preferably eco-friendly) to retain moisture and achieve perfect growth. Don't forget to use a container to collect the drained water. All detailed explanations are provided in a manual with the sprouter.